Posts

Showing posts from January, 2022

Restrict Cells to Accept Only Whole Numbers Using Data Validation

Image
In this blog post we will learn to restrict the cells to accept only Whole Numbers with the help of “Data Validation” functionality in excel. For example, we want to ask user to enter only Whole Numbers which are between values 5 to 10 and if user enters any other value which is beyond this range then the cell should not accept it. For this we will use “Data Validation” functionality in excel. “Data Validation” can be found in “Data” tab under “Data Tools” group. Now let’s see how we can use this “Data Validation” command to restrict cell to accept only Whole Numbers: 1. Select the cells in which we wish to restrict the Whole Numbers. In this case we want to restrict Whole Numbers in cell “B1”. 2. Click on Data Validation command under “Data Tools” group which will appear 03 further options and out of these 03 options again select “Data Validation”. 3. Once we click on “Data Validation” command, one dialog box named as “Data Validation” will appear on screen. 4. Under this dialog box,

Restrict Cells to Accept Only Decimal Values Using Data Validation

Image
In this blog post we will learn to restrict the cells to accept only decimal values with the help of “Data Validation” functionality in excel. For example, we want to ask user to enter only decimal values which are less than 5.00 in cell. If user enters any other value which is greater than 5.00 then the cell should not accept it. For this we will use “Data Validation” functionality in excel. “Data Validation” can be found in “Data” tab under “Data Tools” group. Now let’s see how we can use this “Data Validation” command to restrict cell to accept only decimal values: 1. Select the cells in which we wish to restrict the decimal values. In this case we want to restrict decimal values in cell “B1”. 2. Click on Data Validation command under “Data Tools” group which will appear 03 further options and out of these 03 options again select “Data Validation”. 3. Once we click on “Data Validation” command, one dialog box named as “Data Validation” will appear on screen. 4. Under this dialog box

Restrict Cells to Accept Only Dates Using Data Validation

Image
In this blog post we will learn to restrict the cells to accept only dates with the help of “Data Validation” functionality in excel. For example, we want to ask user to enter the date in highlighted cell but the condition is that the entered date should be between “Date 1” and “Date 2”. If user enters any other date beyond this range then the highlighted cell should not accept it. For this we will use “Data Validation” functionality in excel. “Data Validation” can be found in “Data” tab under “Data Tools” group. Now let’s see how we can use this “Data Validation” command to restrict cell to accept only dates: 1. Select the cells in which we wish to restrict the date. In this case we want to restrict text date in cell “A5”. 2. Click on Data Validation command under “Data Tools” group which will appear 03 further options and out of these 03 options again select “Data Validation”. 3. Once we click on “Data Validation” command, one dialog box named as “Data Validation” will appear on scre

Restrict Text Length using Data Validation

Image
In this blog post we will learn to restrict text length with the help of “Data Validation” functionality in excel. For example, we want to ask user to enter Postal Code in the excel sheet. In India postal code is always with 06 digits. We want user to always enter 06 digits in this field so that we will get correct input data from user. For this we will use “Data Validation” functionality in excel. “Data Validation” can be found in “Data” tab under “Data Tools” group. Now let’s see how we can use this “Data Validation” command to restrict text length: 1. Select the cells in which we wish to restrict the cell length. In this case we want to restrict text length in cell “B2”. 2. Click on Data Validation command under “Data Tools” group which will appear 03 further options and out of these 03 options again select “Data Validation”. 3. Once we click on “Data Validation” command, one dialog box named as “Data Validation” will appear on screen. 4. Under this dialog box, click on “Settings” t

Applying Filter on Icon Sets in Excel

Image
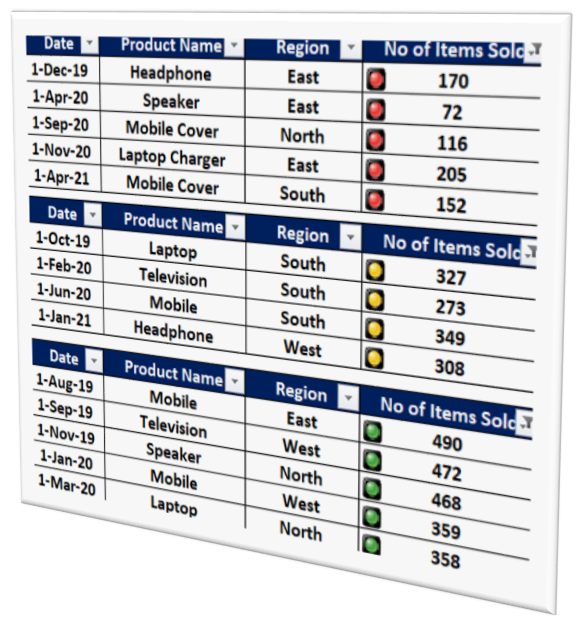
In this blog post we will learn to apply filter on “ Icons Sets ” in excel. For this we have a data of some electronic products sold in East, West, South and North regions from 1st Aug 2019 to 1st Apr 2021 with us and we have applied Icon Sets to this data. We have applied 3 Traffic Light Icon Sets to values under column “No of Items Sold”. We will now see how we can apply filters on these Icon Sets in above data: 1. Select the entire data on which we wish to apply filter on Icon Sets . 2. Go to “Data” tab and click on the “Filter” command (Data tab and Filter command are highlighted with red in below image). 3. Once we click on the “Filter” command, we can see that drop down button is now applied to all the cells in header row of the data on which we have applied Icon Sets as shown in red highlighted area. 4. Click on the drop down button for cell “No of Items Sold” from header row of the data on which we have applied Icon Sets . This will show us further options to apply the filte