GoTo Special in Excel: Part 1
Previously we have learned about “Find & Select Commands” in excel (Click here to read more on this). In that post we have already seen various methods to get “GoTo Special” dialog box. This “GoTo Special” dialog box will look like as shown in below image.


3. As a result we can see that all the comments in our excel sheet will get selected at a time.


3. Once we click on “OK” button we can see that all the formulas are highlighted as shown in below image.


2. Select option “Blanks” in “GoTo Special” dialog box and click on “OK” button.


3. As a result, we can see that current region is selected as shown in below image.


3. As a result, we can see that all the objects will get selected as shown in below image.


 We will see remaining options of "GoTo Special" dialog box in our next blog post i.e. Part 2. Click here to learn about remaining options "GoTo Special in Excel: Part 2"

We will learn how to use all the options which are available in this "Go To Special" dialog box. These options are:
1. Comments
2. Constants (Numbers, Text, Logicals, Errors)
3. Formulas (Numbers, Text, Logicals, Errors)
4. Blanks
5. Current region
6. Current Array
7. Objects
8. Row difference
9. Column differences
10. Precedents (Direct only, All levels)
11. Dependents (Direct only, All levels)
12. Last Cell
13. Visible cells only
14. Conditional Formats (All, Same)
15. Data Validation (All, Same)
Comments:
This option will help us to select all the comments from selected sheet.
1. Let’s say we have inserted few comments in our excel sheet as shown in below image.

2. Select option “Comments” in “GoTo Special” dialog box and click on “OK” button.


Constants (Numbers, Text, Logicals, Errors):
This option will help us to select all the cells in our excel sheet which are constants. Constant cells are the cells which no any formula is applied.
1. We have a dummy data of 10 students and marks obtained by them in three subjects Maths, English and Science. Also we have calculated total marks obtained by each student by using SUM function.

2. Select option “Constant” in “GoTo Special” dialog box. This will enable additional 04 options:
a. Numbers: This option will select all the constants which contains numbers.
b. Text: This option will select all the constants which contains texts.
c. Logicals: This option will select all the constants which contains logical values such as TRUE/FALSE.
d. Erros: This option will select all the constants which contains errors.
We can select any of these option or we can select all the options depending upon our requirement.

3. Once we click on “OK” button we can see that all the constants are highlighted as shown in below image.

Formulas (Numbers, Text, Logicals, Errors):
This option will help us to select all the cells in our excel sheet which contains formula.
1. We have a dummy data of 10 students and marks obtained by them in three subjects Maths, English and Science. We have calculated total marks obtained by each student by using SUM function. We have also calculated Grades by using IF function.

2. Select option “Formula” in “GoTo Special” dialog box. This will enable additional 04 options:
a. Numbers: This option will select all the formulas which returns numbers.
b. Text: This option will select all the formulas which returns texts.
c. Logicals: This option will select all the formulas which returns logical values such as TRUE/FALSE.
d. Erros: This option will select all the formulas which returns errors.
We can select any of these option or we can select all the options depending upon our requirement.


Blanks:
This option will help us to select all the blank cells within selected Cell Range.
1. Select the Cell Range from which we wish to select the blank cells.
3. As a result, we can see that all the blank cells are selected within our selected cell range.
Current region:
This option will help us to select the current region. Current region is the cell range which is surrounded by blank cells from all the four sides.
1. Select any cell from the cell range. Here we have selected cell with cell address “C4”.

2. Select option “Current region” in “GoTo Special” dialog box and click on “OK” button.


Current Array:
This option will help us to select current array if the selected cell is part of an array.
1. For cell range “A1:A10” we have applied array formula and selected cell A1 which is a part of array. (This formula we can see in the Formula Bar).

2. Select option “Current array” in “GoTo Special” dialog box and click on “OK” button.

3. As a result, we can see that the current array is now selected as shown in below image.

Objects:
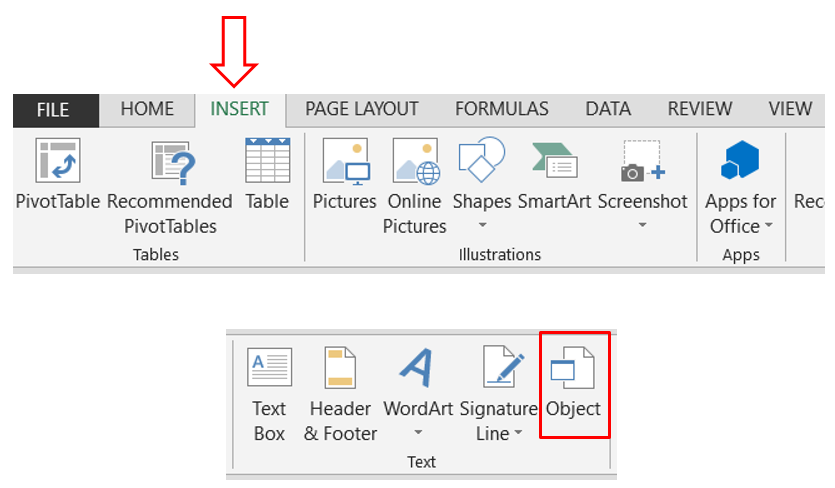
This option will help us to select all the objects from selected sheet.
1. We have entered some shapes in excel sheet as shown in below image. (Click here to learn how to insert shapes in excel)

2. Select option “Objects” in “GoTo Special” dialog box and click on “OK” button.


Row difference:
This option will help us to select the cell values which are different that selected cell value in respective row.
1. We have listed few numbers in a row as shown in below image. Now we have selected entire range and the cell value which is selected in this cell range is from cell address “B2” (We can see the cell address in Name Box and value from this cell address in Formula Bar).

2. Select option “Row differences” in “GoTo Special” dialog box and click on “OK” button.

3. As a result we can see that all the cell values which are different that cell value in cell “B2” will get selected.


Comments
Post a Comment